Create a Fair Launch
Overview
This guide provides a step-by-step walkthrough on how to create a Fair Launch pool for your token on the Pinksale platform, applicable across the blockchains Pinksale supports. Fair Launches ensure everyone gets the same token price regardless of when they contribute. After reading this, you will understand:
- The definition and calculation of the token price in a Fair Launch.
- The four main steps involved: Verifying Token, Inputting Fair Launch Info, Adding Additional Info, and Finishing.
- The specific fields and parameters required in each step (e.g., token address, softcap, liquidity percentage, router selection).
- Important considerations like fee options, listing options, and the affiliate program.
- Key notes regarding token functions (transfer fees) and stablecoin pairs.
- How to use related Pinksale resources like the Calculator and PinkLock.
Watch the Video Guide: How to Create a Fairlaunch on Pinksale (Note: Video might show a specific chain, but principles apply broadly)
Note: At fair launch, everyone will have the same token price after the fair launch ends. It doesn't matter if you buy first or late. Token price = total raised funds / total tokens for fair launch.
Step 1: Verify Token
- Connect your wallet to Pinksale, ensuring you are on the correct network (e.g., BSC, Ethereum, Polygon, etc.).
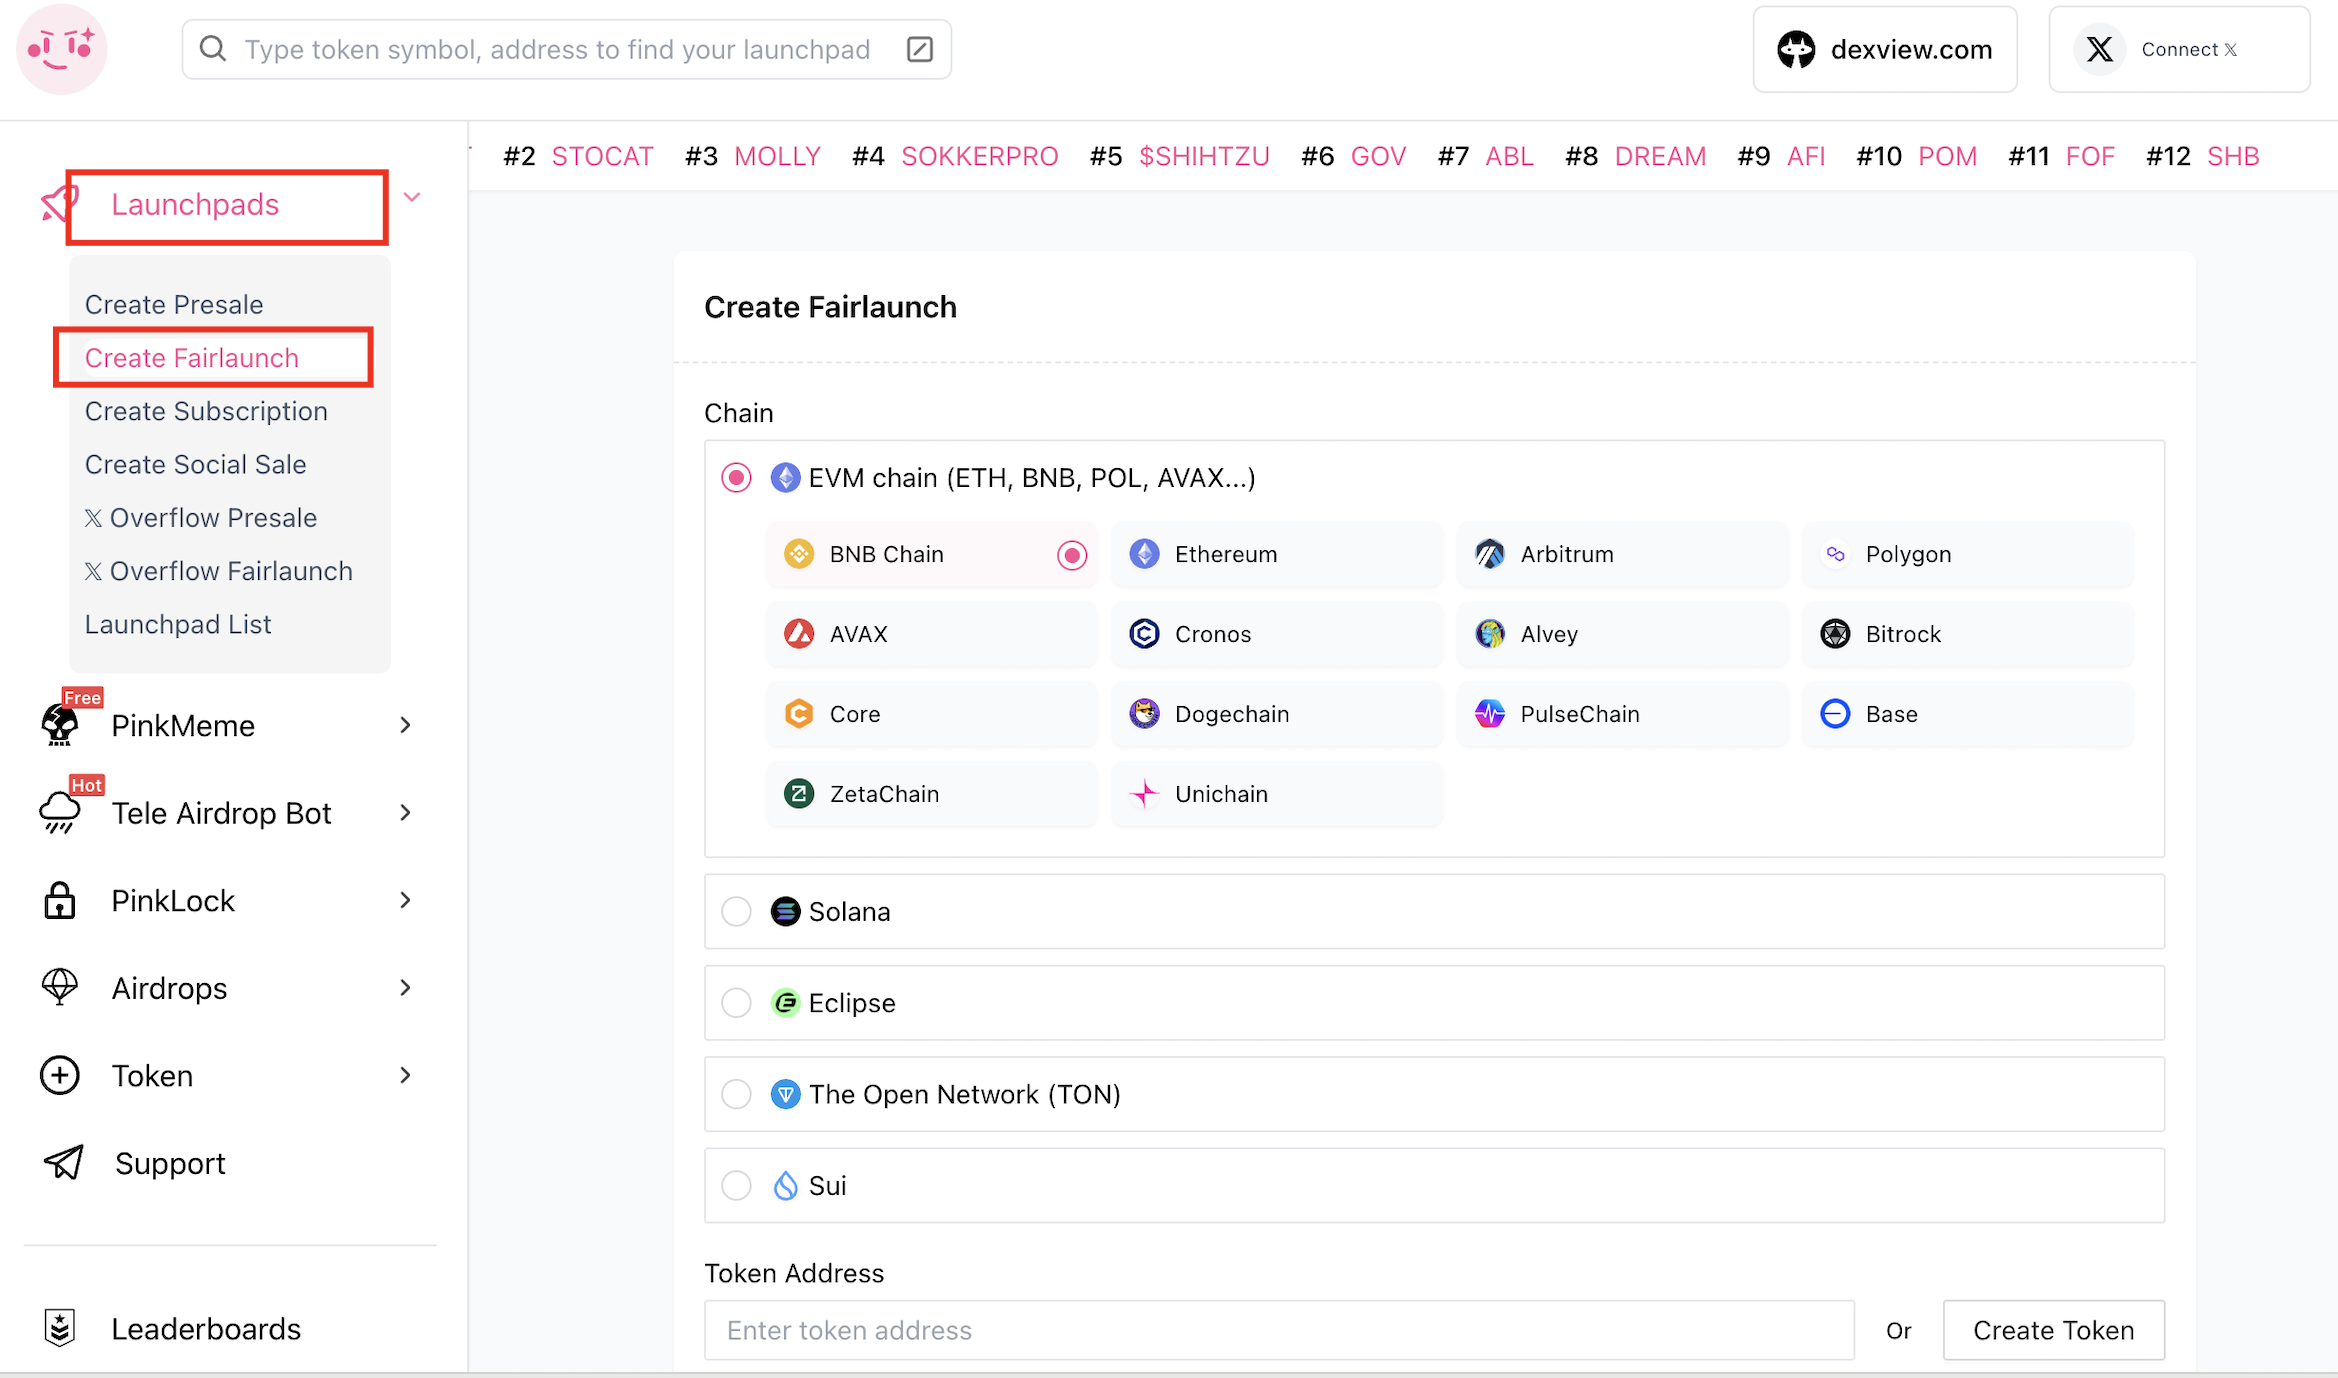
- From the homepage, click on "Launchpads" => "Create fair launch". You will be redirected to the creation page: https://www.pinksale.finance/fairlaunch/create
-
Choose the blockchain network for your fair launch (e.g., BNB Chain, Ethereum).
-
Input your Token Address. If you don't have a token, you can click "Create Token" to make one. Once you enter a valid token address, the system will auto-fill the token's Name, Symbol, and Decimals.
-
Select how you want to pay the creation fee under "Paid As".
-
Choose the Currency for fundraising (e.g., BNB, BUSD).
-
Select a Fee option. There are several fee structures available.
-
Choose a Listing Option:
- Auto listing: Liquidity will be added automatically after you Finalize the pool. This is the recommended option for most projects.
- Manual listing: You will have to add liquidity manually after finalizing.
-
Decide whether to enable the Affiliate program.
-
After making your selections, review everything and click on "Next".
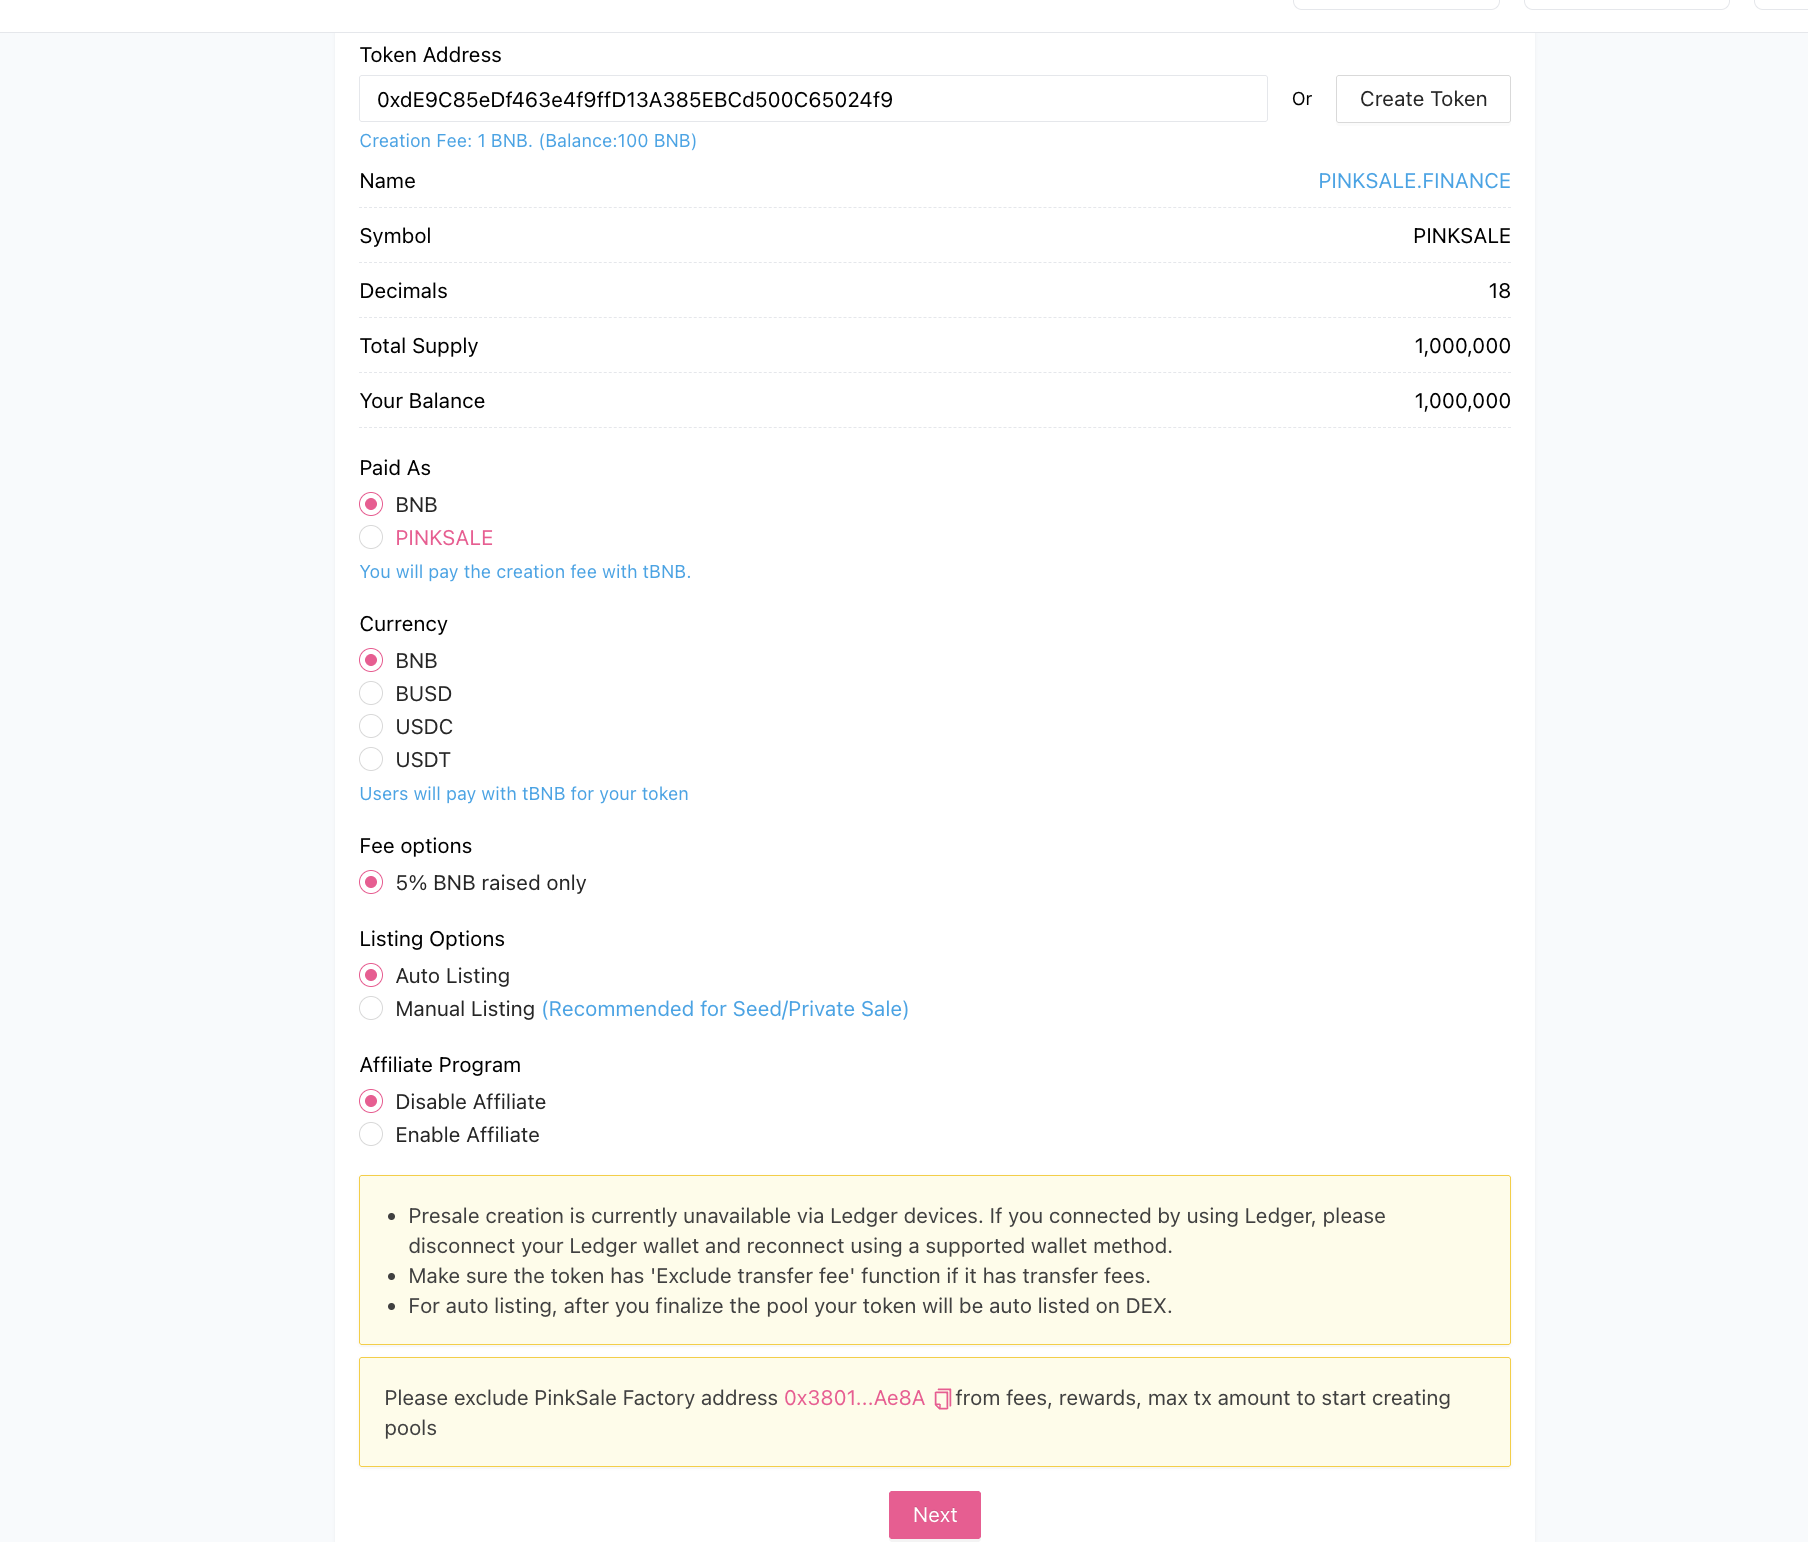
Note: The image above is for Step 1. Please ensure it is replaced with the most current screenshot reflecting the fields described.
Step 2: Input Fair Launch Information
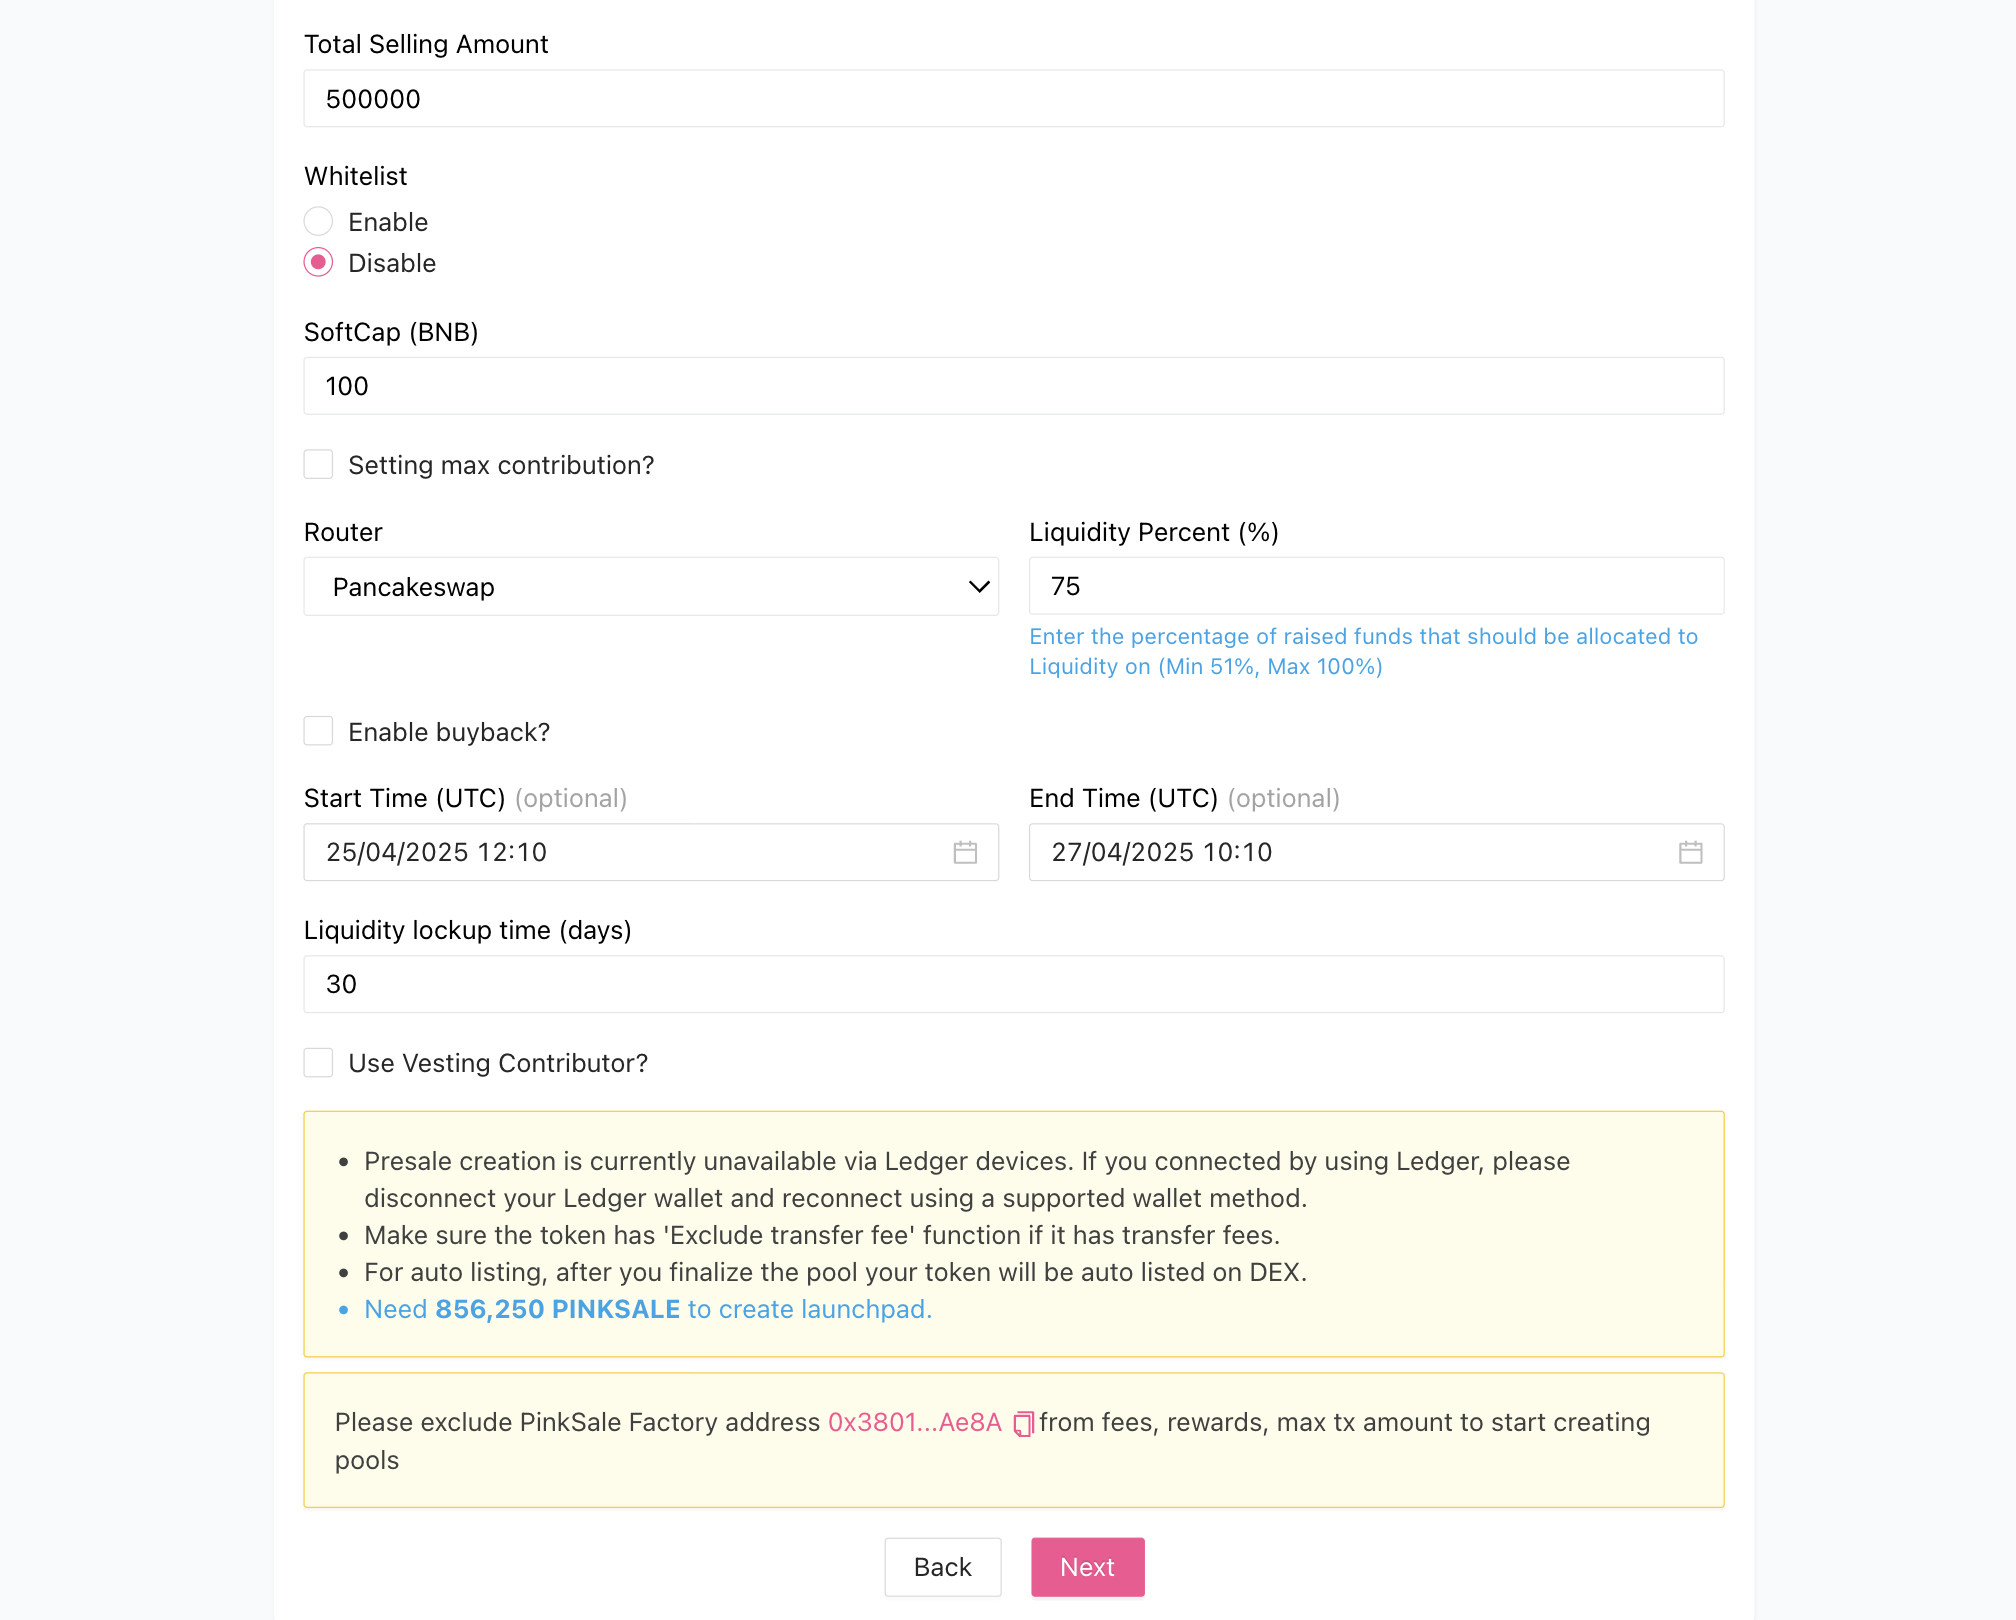
After verifying your token, you need to enter the details for your Fair Launch pool.
- Ensure all numerical inputs are positive numbers.
- Total selling amount: Enter the total number of your tokens you want to sell in this fair launch.
- Whitelist: Choose whether to enable or disable the whitelist for your pool. If enabled, only whitelisted users can participate.
- Softcap: Set a reasonable minimum raise amount in the currency you selected for the raise (e.g., BNB, ETH). This number should not be excessively large.
- Setting max contribution?: (Optional) Tick this box if you want to set a maximum amount each user can contribute.
- Router: Select the Decentralized Exchange (DEX) router where liquidity will be added (e.g., PancakeSwap on BSC, Uniswap on Ethereum).
- Liquidity (%): Enter the percentage of the raised funds that will be used to create the liquidity pool. The minimum is 51%, and the maximum is 100%.
- If you choose the Buyback option, the sum of the Buyback percentage + Liquidity percentage must be 51% or greater (Refer to this post on Fair Launch Buy Back Option).
- Enable buyback?: (Optional) Tick this box to enable the buyback mechanism.
- Start time & End time: Select the start and end date/time for your fair launch pool. The start time must be before the end time.
- Liquidity lock-up time: Specify how long the liquidity pool tokens will be locked (e.g., 365 days).
- Use Vesting Contributor?: (Optional) Tick this box if you want to set up a vesting schedule for contributors' tokens.
After filling in this information, the interface will show the total number of your project tokens required to create the fair launch pool.
-
Tip: Use the Pinksale Calculator to help plan your tokenomics effectively.
Step 3: Add Additional Info
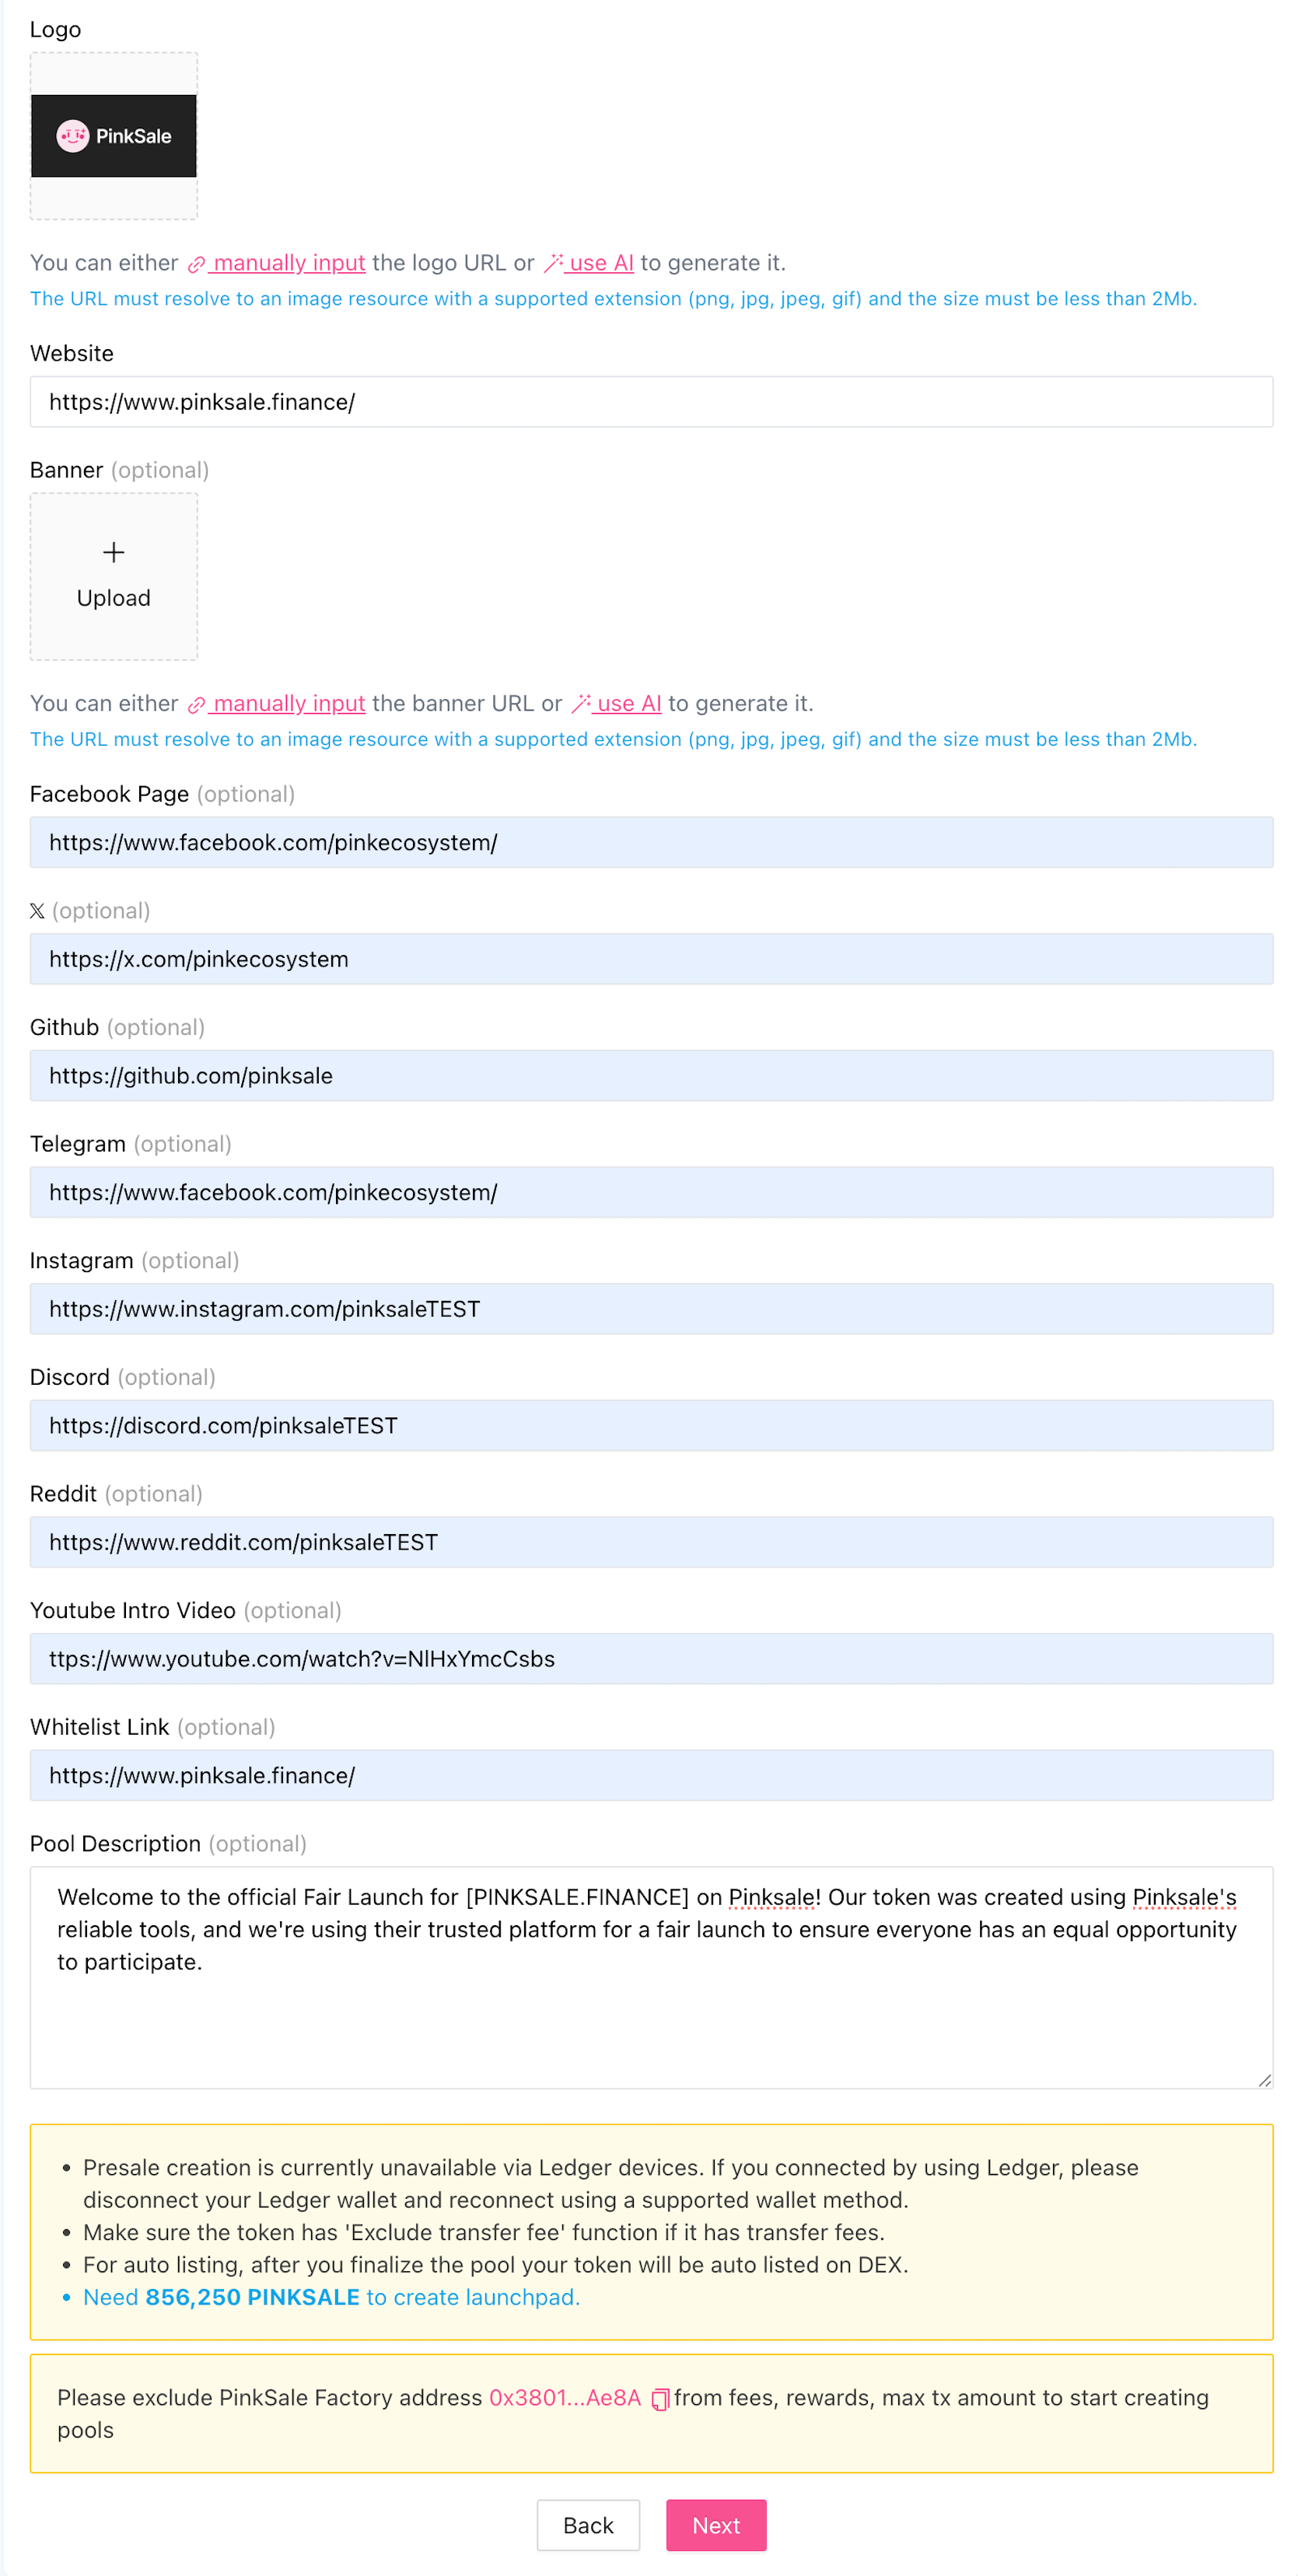
Provide additional details about your project for the launchpad page.
- Logo URL and Website fields are required. You have two options for the logo:
- Option A: Use Pinksale's AI Logo Generator: Generate a logo using AI directly on the platform.
- Option B: Provide Your Own Logo URL: Paste a direct URL to your logo image. The URL must end with
.png,.jpg,.jpeg, or.gif.
- Banner URL: Similar to the logo, you can either use the AI generator or provide a direct URL for your banner image.
- Fill in other fields like links to your project's social media (Github, Twitter, Telegram, etc.).
- Click "Next" when you have entered all the information.
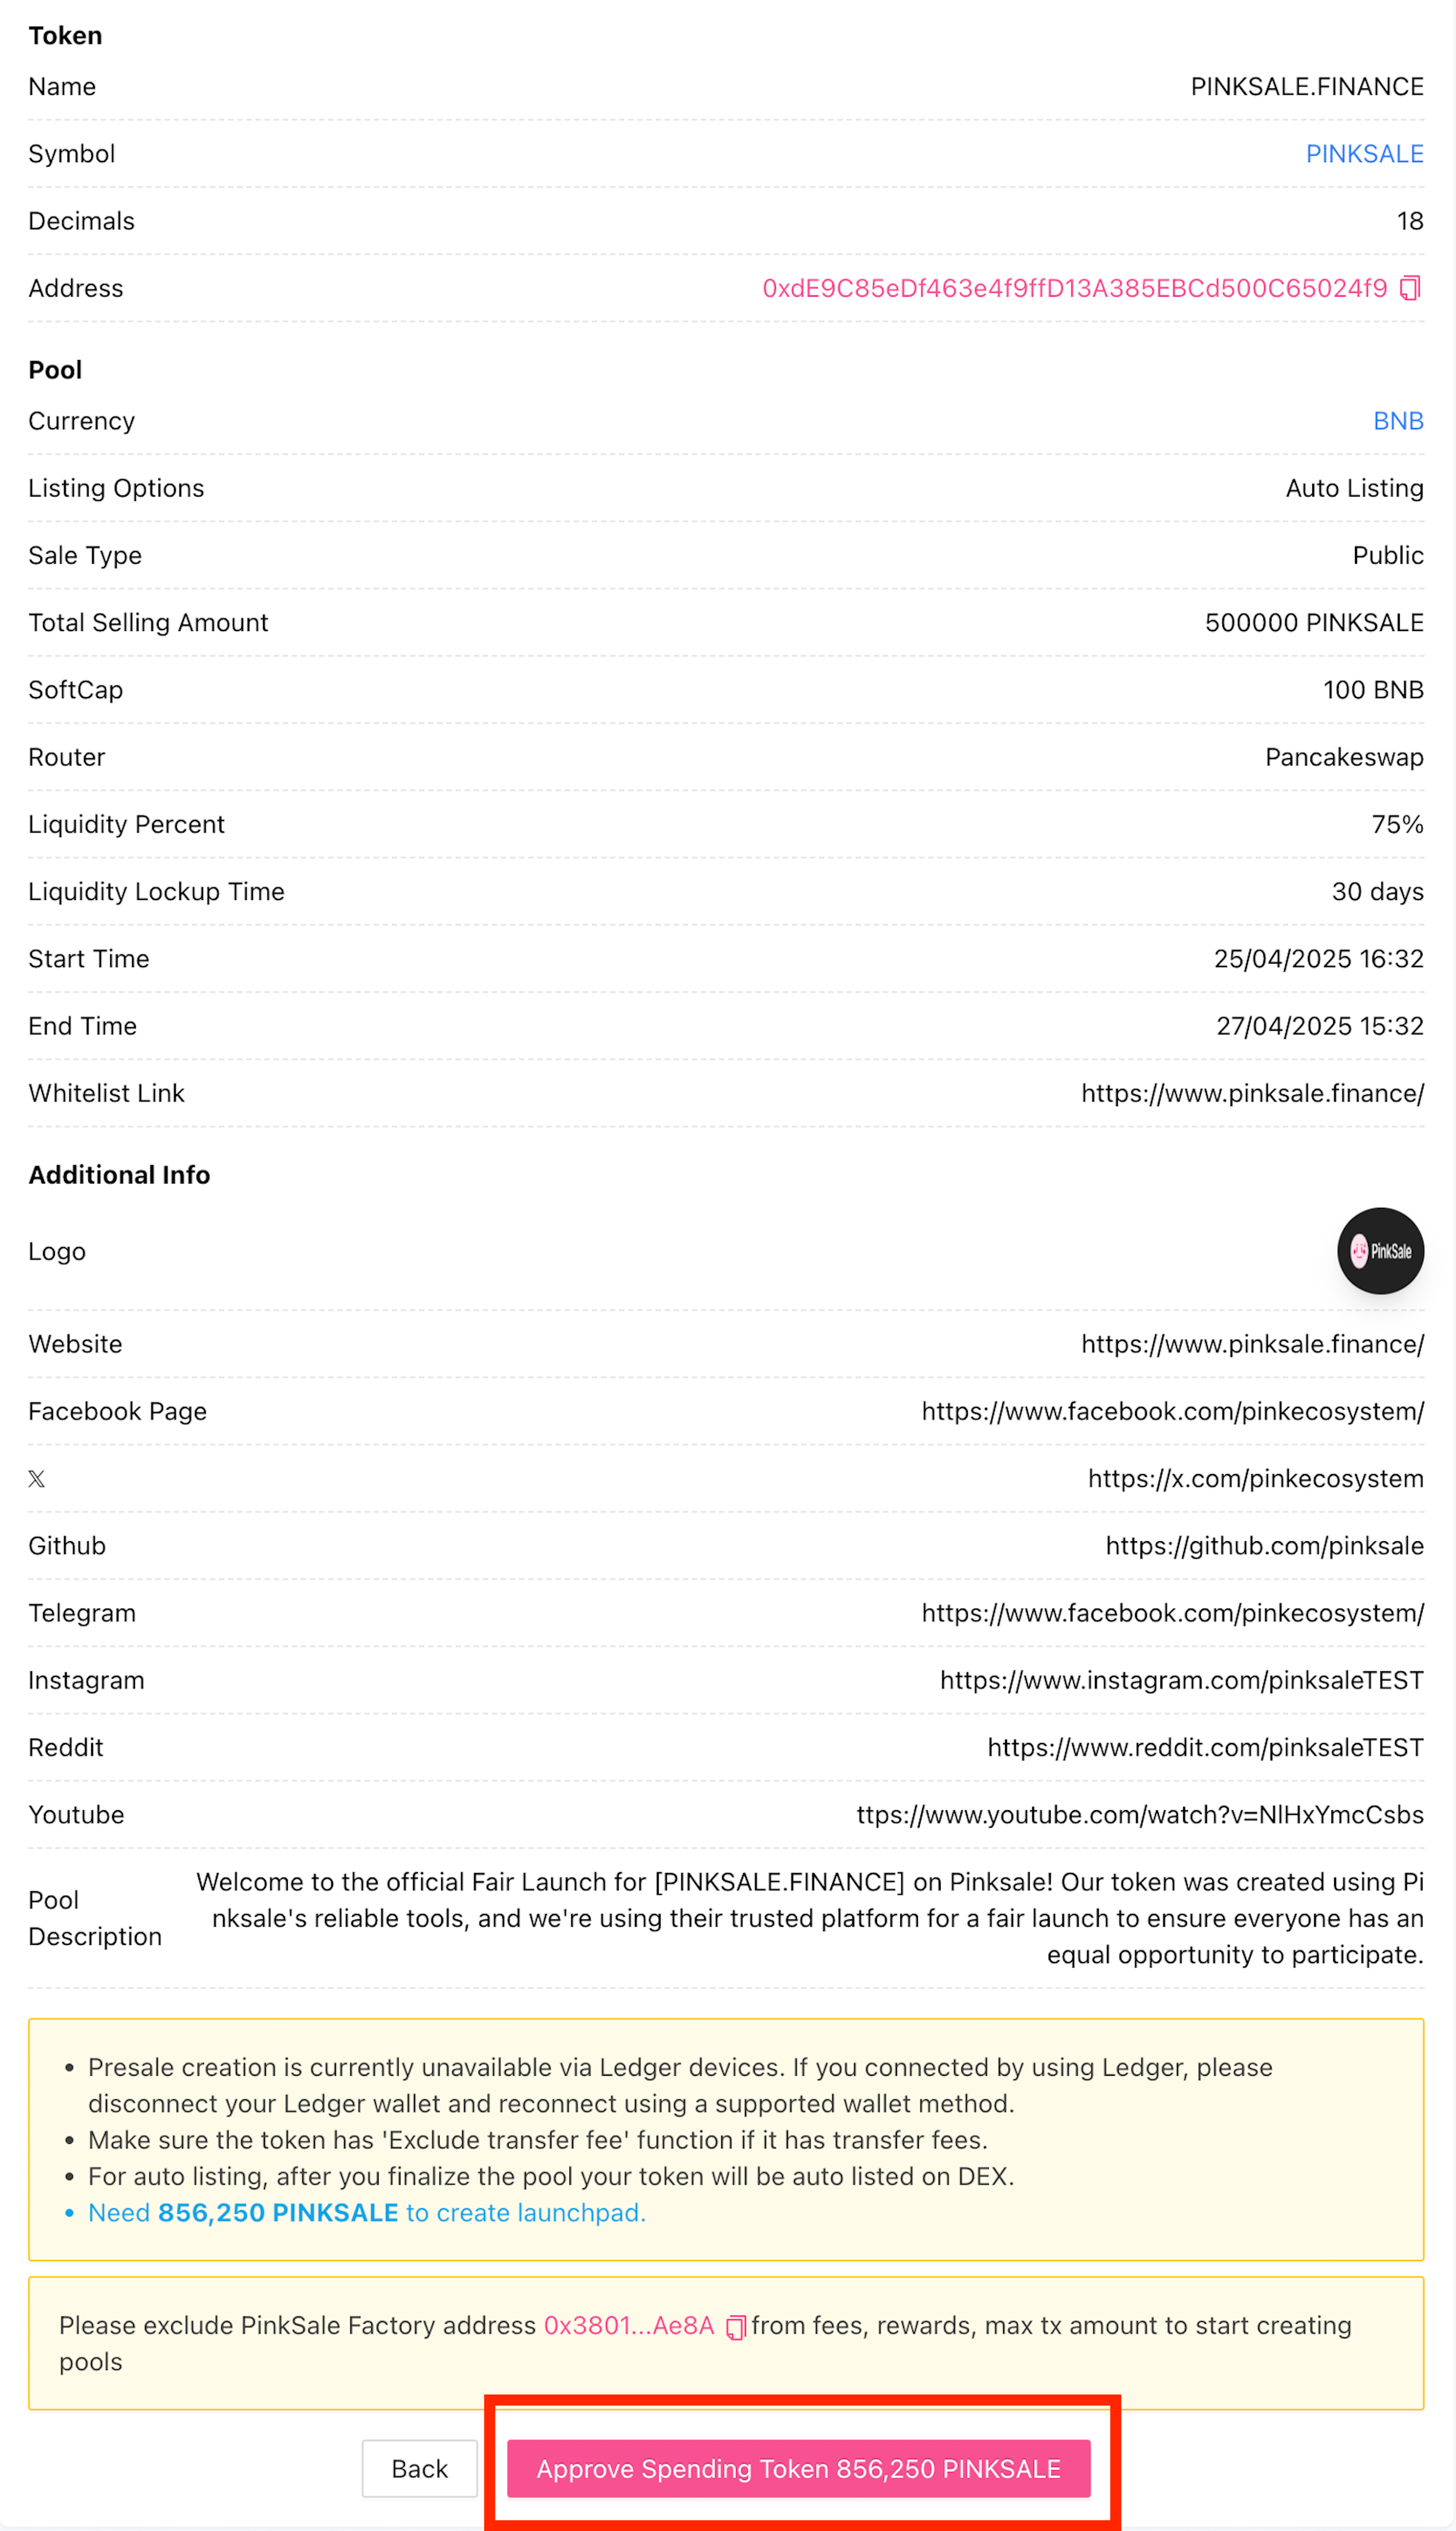
Step 4: Finish
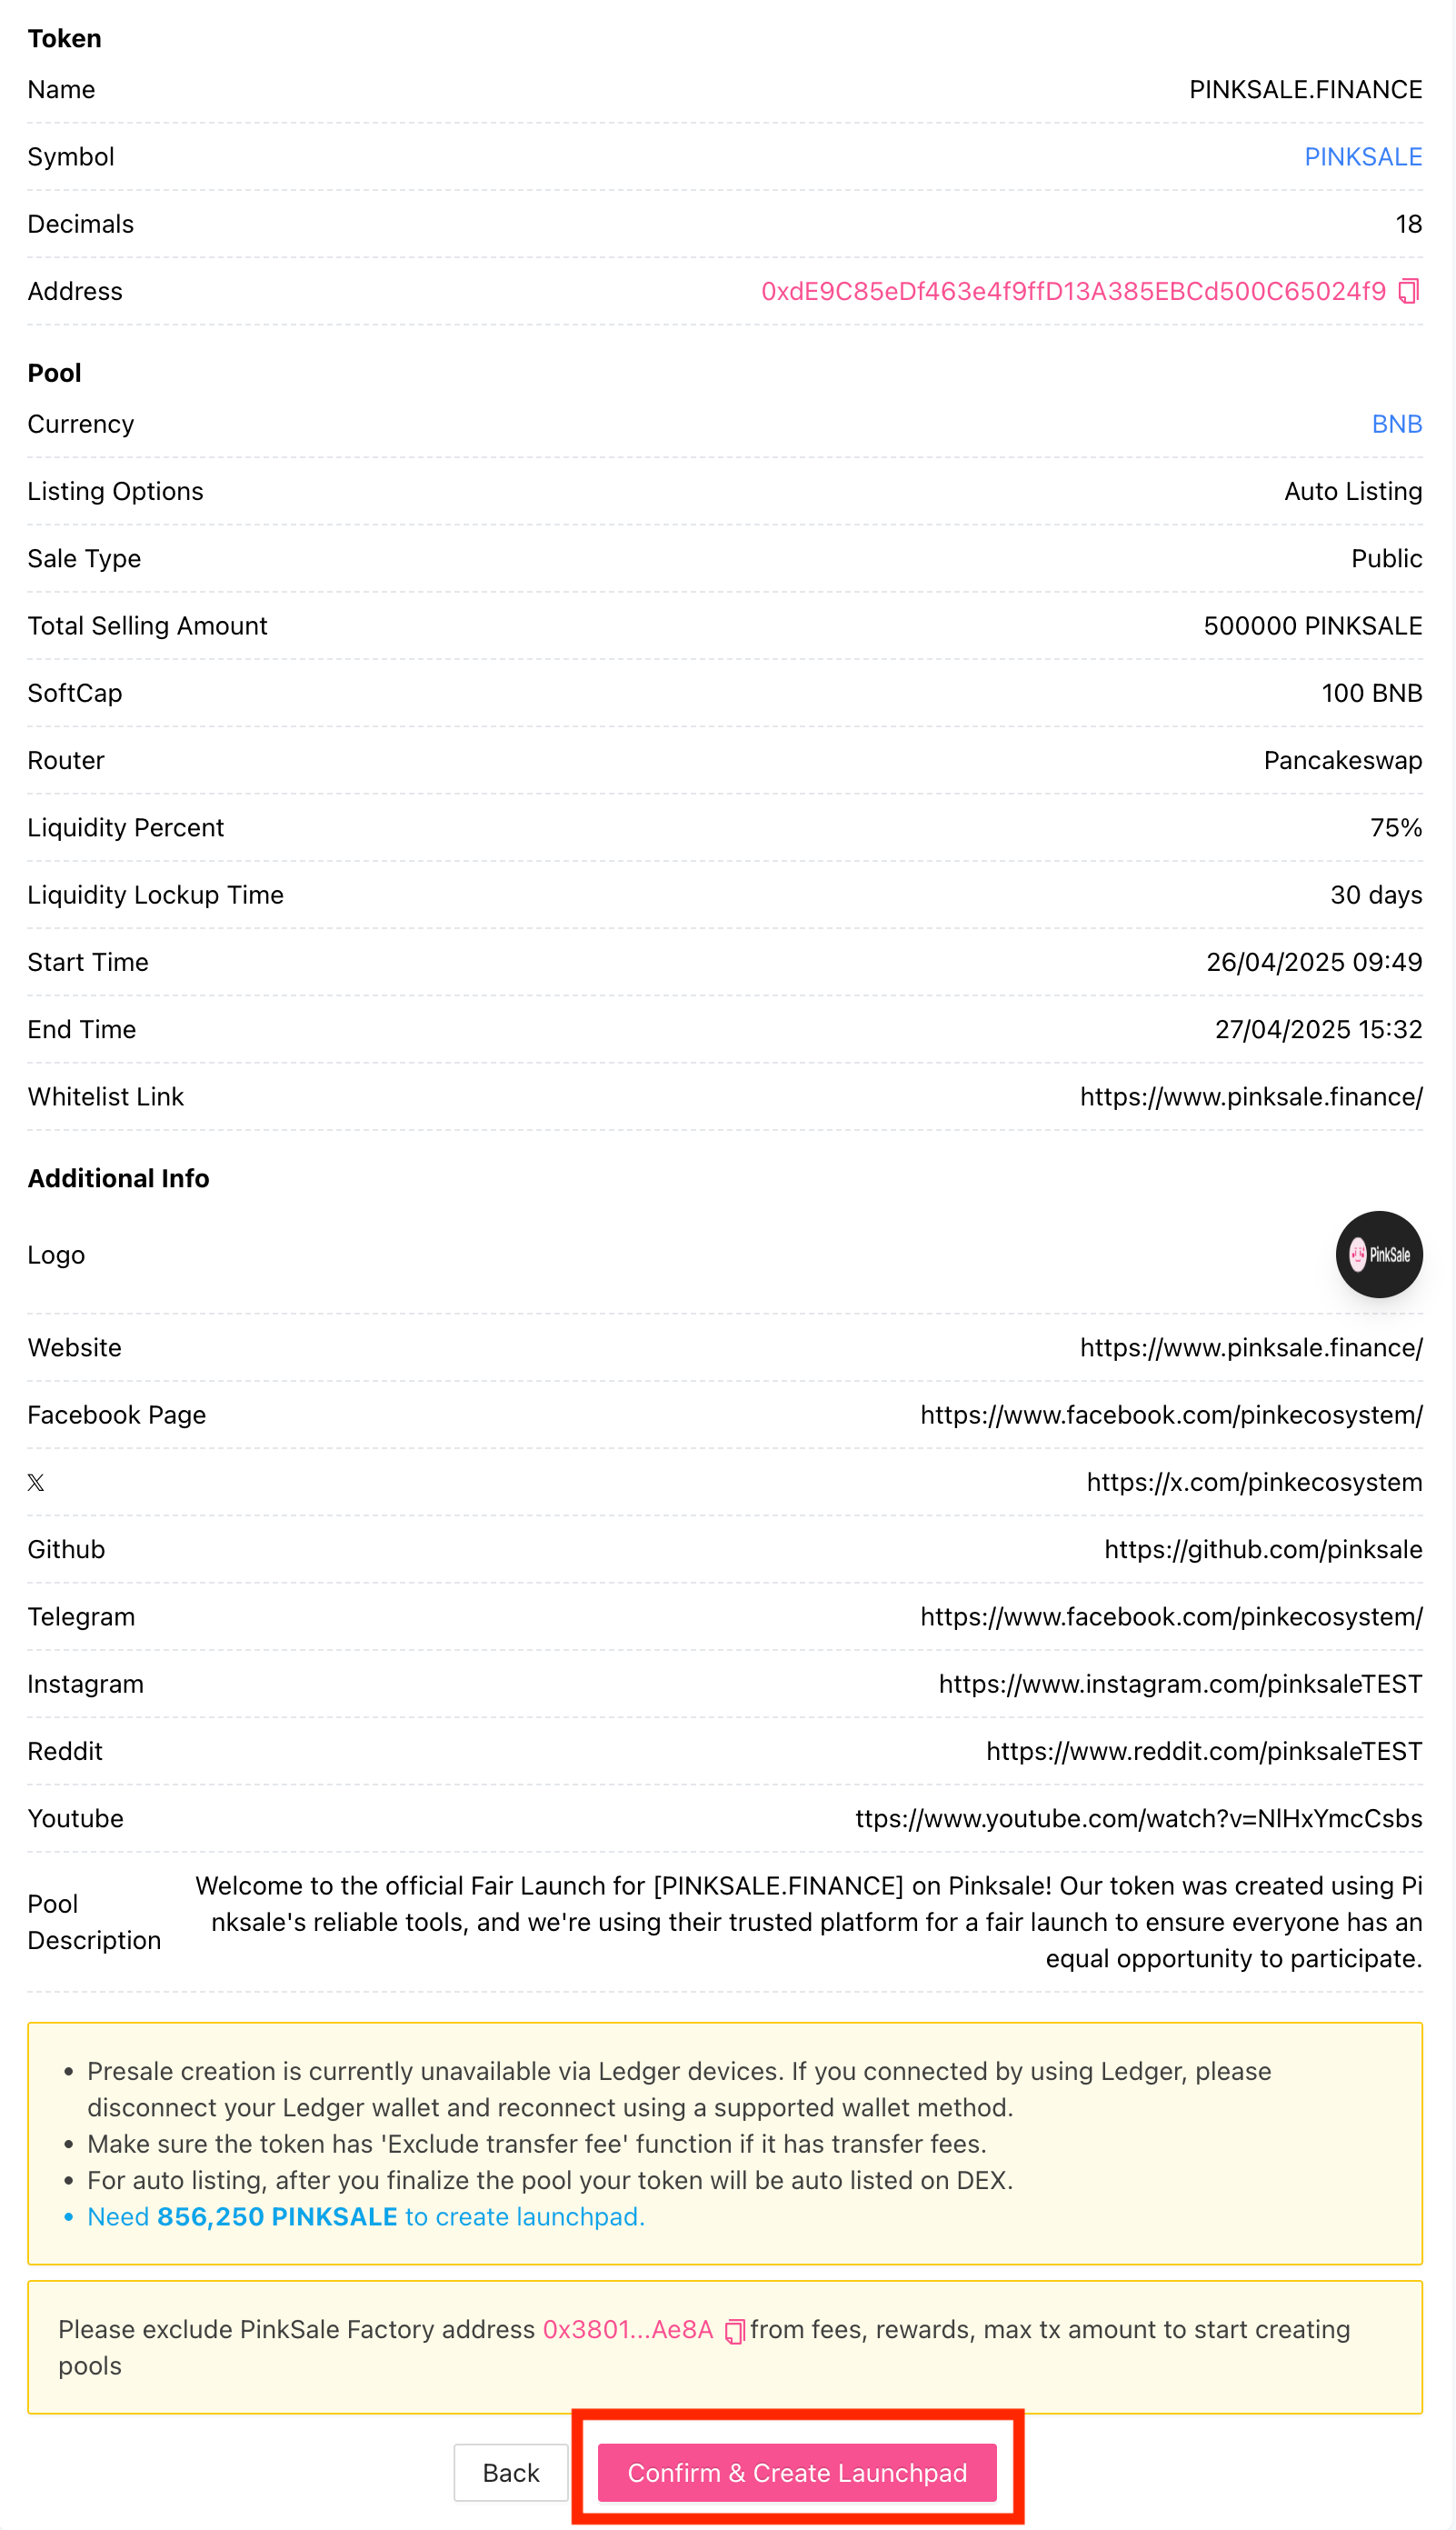
This is the final review stage before creating your Fair Launch pool.
-
Carefully review all the information you have entered. You can go back to previous steps to make changes if needed.
-
Click "Approve Spending Token" and confirm the transaction in your wallet. This allows Pinksale to access the required amount of your project tokens for the sale and liquidity. Ensure you have enough native chain currency (like BNB, ETH, MATIC) for gas fees.
-
Once the approval transaction is confirmed, click the final "Confirm & Create Launchpad" button.
-
Your wallet will ask for one last confirmation for the pool creation transaction, showing the final network fee (gas fee). Click "Confirm" if you agree. Ensure you have enough native chain currency for this fee.
-
Your Fair Launch pool is now created! This is the result:
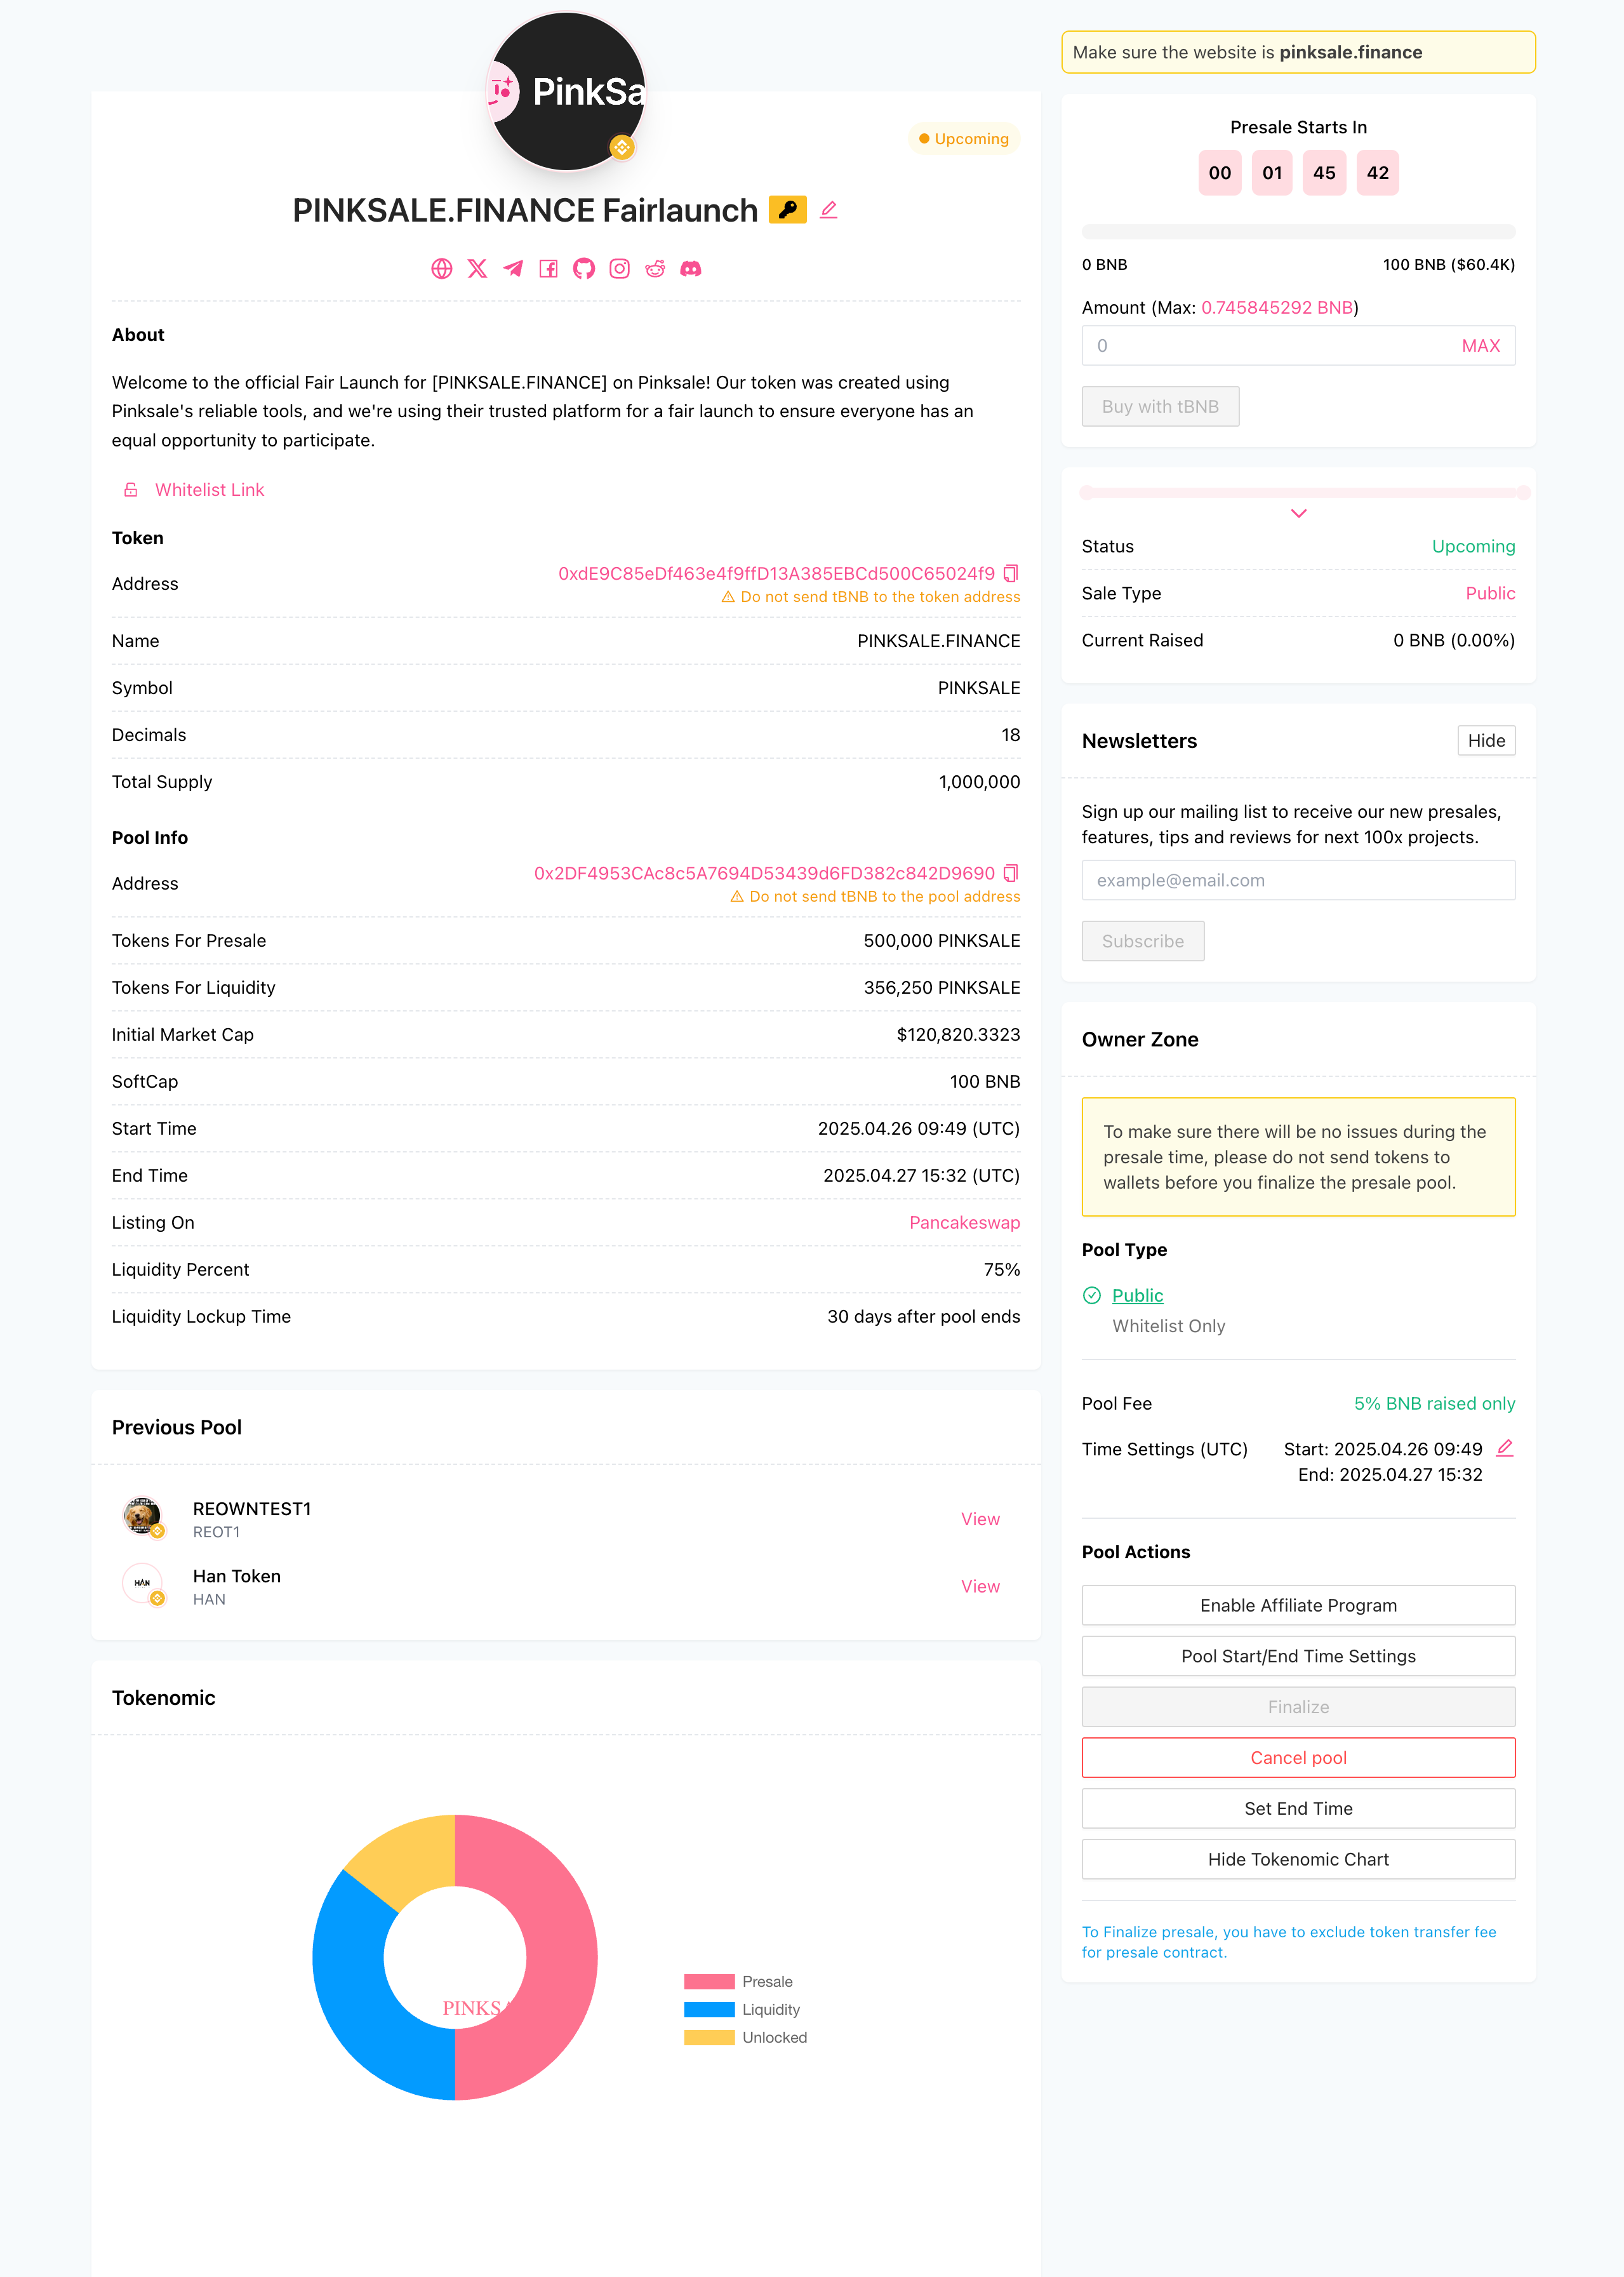
Note: **You can use Pink Lock to lock team tokens or other tokens and display this information via an editable tokenomic chart on your Fair Launch page.**
Q&A (FAQs)
- Q1: What makes a Fair Launch "fair"?
- A: The key fairness aspect is that the final token price is the same for everyone, calculated only after the sale ends (Total Raised Funds / Total Tokens Sold). Early buyers don't get a cheaper price than later buyers.
- Q2: What's the difference between Auto Listing and Manual Listing?
- A: With Auto Listing, Pinksale automatically creates the liquidity pool on your chosen DEX when you finalize the pool. With Manual Listing, you receive the raised funds and the remaining tokens, and you must create the liquidity pool yourself on the DEX.
- Q3: What is the Softcap?
- A: The Softcap is the minimum amount of funds (in the currency being raised) that need to be collected for the fair launch to be considered successful. If the softcap isn't reached by the end time, the fair launch fails, and contributors can claim refunds.
- Q4: Why is the minimum liquidity percentage 51%?
- A: This ensures a substantial portion of the raised funds goes towards creating a stable trading pool on the DEX, which is crucial for healthy price action and investor confidence.
- Q5: What happens if my token has transfer fees (taxes)?
- A: Your token contract must have a function to exclude addresses (like the presale contract, router, and pair addresses) from these fees. Otherwise, the fair launch creation, liquidity adding, and potentially trading will fail or incur unintended taxes.
Troubleshooting
- Q: I'm getting an error when trying to verify my token in Step 1.
- A: Ensure you are connected with the correct wallet and network (e.g., BSC, Ethereum, Polygon). Double-check the token address. If your token has taxes, confirm it has the necessary 'exclude transfer fee' function. If raising with stablecoins, ensure your token is non-taxed.
- Q: The interface shows I need more tokens than I expected in Step 2.
- A: This calculation includes the 'Total selling amount' plus the tokens for initial liquidity (based on 'Liquidity %' and implied listing price). Use the Pinksale Calculator to plan.
- Q: My Logo URL isn't accepted in Step 3.
- A: Ensure the URL links directly to the image file and ends with
.png,.jpg,.jpeg, or.gif.
- A: Ensure the URL links directly to the image file and ends with
- Q: My "Approve Spending Token" transaction fails in Step 4.
- A: Ensure you have enough native chain currency (like BNB, ETH, MATIC) in your wallet for gas fees. Confirm the correct wallet is connected.
- Q: My pool creation transaction ("Submit") failed in Step 4.
- A: This could be due to insufficient gas fees, network congestion, or a token contract issue (taxes, decimals, etc.). Check the error on the relevant block explorer (like BscScan, Etherscan) for details. Contact a developer or Pinksale support if needed.